%20(1).png?alt=media)
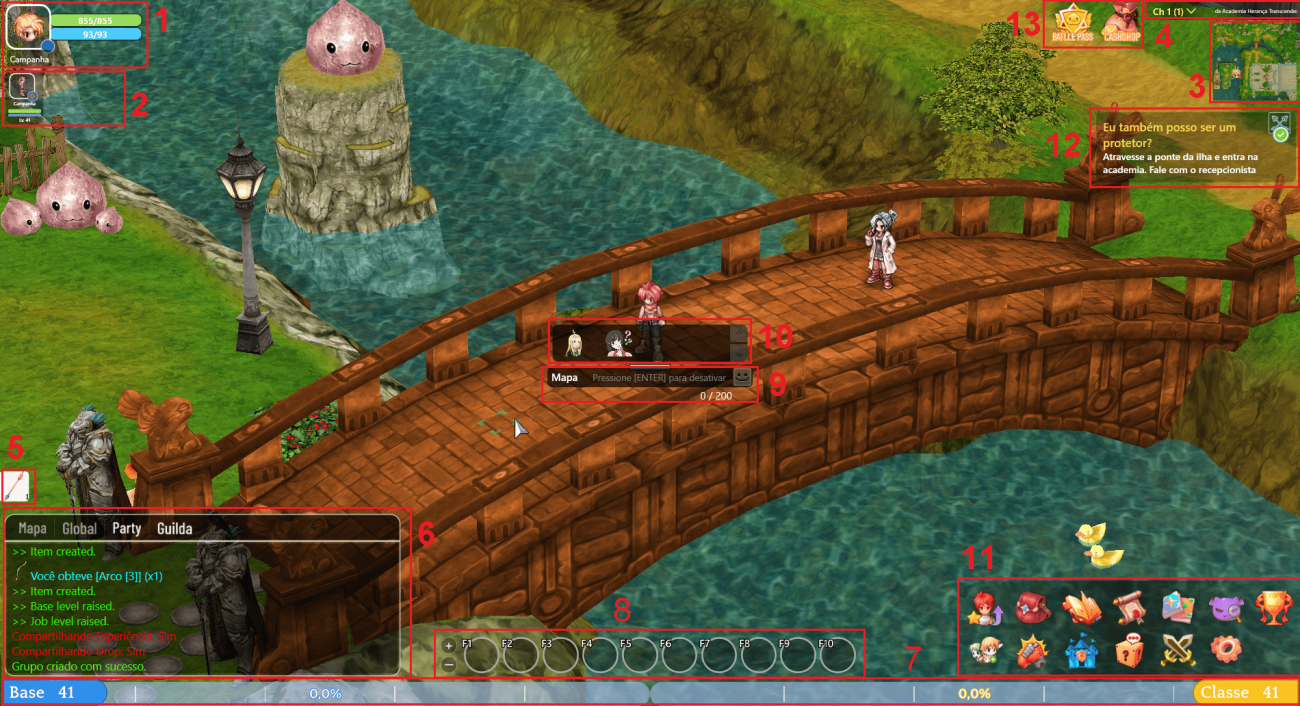
General Overview of the HUD
| N | Name | Description |
|---|---|---|
| 1 | Character Information | Displays your character's avatar, name, HP, Mana, and Emblem. |
| 2 | Party Information | Shows information about connected party members, such as level, name, HP, Mana, and Emblem. |
| 3 | Mini Map | Mostra o nome atual do mapa, a imagem e o rosto de seu personagem. |
| 4 | Channels | Allows you to see how many players are in the current channel and switch channels when available. |
| 5 | Ammunition Indicator | Displays the current amount of equipped ammunition for quick reference without opening the inventory. |
| 6 | Chat | Shows the message history. |
| 7 | Experience Bar | Displays the player's current base and class level, as well as the current percentage of total experience needed to level up. |
| 8 | Shortcut | Allows you to drag skills to F1-F12. |
| 9 | Message Box | Press ENTER to type a message and press ENTER again to send it. |
| 10 | Sticker List | Click to send a sticker. |
| 11 | Menus | You can open the game menus by clicking on them or using key combinations. |
| 12 | Quest's | Displays the quests the player is currently on, with the "In Progress" option marked on the Quest screen to help track objectives. |
| 13 | Cash Shop and Battle Pass | Allows you to open the cash shop menus and battle pass. |
| STATUS | Attribute | Description |
|---|---|---|
| Basic | HP Mana | Your maximum HP Your maximum Mana |
| Damage | Attack Magic Attack Accuracy Critical | Your physical attack power Your magic attack power |
| Defense | Physical Defense Magic Defense Evasion | Your defense against physical attacks Your defense against magical attacks Your chance to evade attacks |
| Others | Attacks per minute | QHow many attacks your character performs per second |
Inventory Table
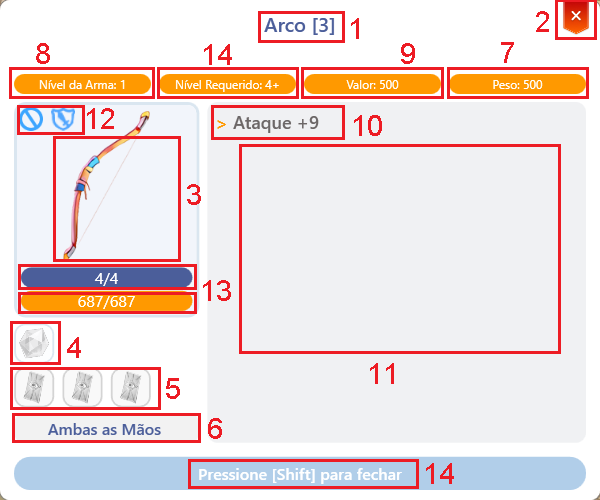
Item Information
| N | Field | Descrição |
|---|---|---|
| 1 | Item Name | Name, condition, and slots. |
| 2 | Close Button | Closes the current view. |
| 3 | Item Image | Displays the item image. |
| 4 | Gemns | Slots and linked effects. |
| 5 | Cards | Slots e efeitoSlots and linked effects. |
| 6 | Position | Equipment location. |
| 7 | Weight | Inventory weight. |
| 8 | Level | Item level. |
| 9 | Selling Price | Value when selling to NPCs. |
| 10 | Random Options | Displays random options. |
| 11 | Description | FItem function and history. |
| 12 | Restrictions | Usage limitations. |
| 13 | Potential and Durability | Displays item condition. |
| 14 | Required | Level required to equip. |
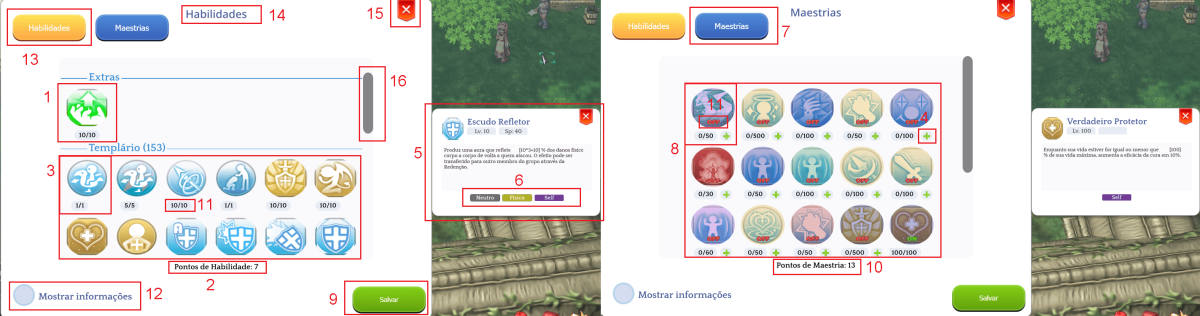
Skills & Masteries
| N | Nome | Description |
|---|---|---|
| 1 | Divider | Divides classes and skills. |
| 2 | Skill Points | Points available for distribution. |
| 3 | Skills | Upgrade and organize skills. |
| 4 | Increase Mastery Points | Increase the mastery level. |
| 5 | Skill Description | Descriptive text of the skill. |
| 6 | Skill Effect Type | Displays the element and characteristics. |
| 7 | Mastery | Specific area button. |
| 8 | Masteries | Displays the character's masteries. |
| 9 | Save | Confirms evolution changes. |
| 10 | Mastery Points | Points available for use. |
| 11 | Skill Level | Maximum skill level limit. |
| 12 | Information | Skills and masteries screen. |
| 13 | Skills | Opens the skills tab. |
| 14 | Description | Details of the selected tab. |
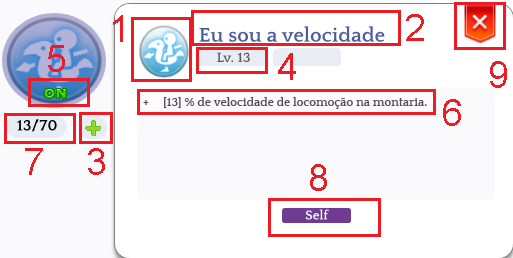
Mastery Field Information
| N | Nome | Descrição |
|---|---|---|
| 1 | Skill Image | Here is the icon of the skill associated with |
| 2 | Name | Here you can see the title of the master's degree displayed |
| 3 | Upgrade Mastery | Click to add 1 level to this mastery, then confirm by |
| 4 | Level | Display the skill level in the format: Lv <Current Mastery Level/ |
| 5 | State | You can turn mastery on or off |
| 6 | Description | Dynamic description of mastery. |
| 7 | Allocated Points | Amount of points invested. |
| 8 | Stats Type | Indicate if it is a buff for oneself, for others, |
| 9 | Close | Close the window |
ALT+E ( Missions tab )
| Tab Name | Description |
|---|---|
| Episode | View all the episodes and quests you have completed or are |
| List | View the list of all quests. Here you can filter quests by type or |
| Complete | In this list, you can see all your completed quests grouped |
| History | Follow the story of Valorian: Tales of Loki on |
.png?alt=media)
When you click on a quest, a window will appear containing some information.
| N | ||
|---|---|---|
| 1 | Quest Title | The title of the quest. |
| 2 | Summary | What you need to do for the mission to be marked as complete. |
| 3 | Objectives | When a quest requires killing monsters, this section displays the monsters you need to defeat and your current progress. |
| 4 | Reward | The reward you receive upon completing the mission. |
| 5 | NPC | The sprite of the NPC who gave you the mission. Hovering over it shows the NPC's name. |
| Ícone | Tipo | Descrição |
|---|---|---|
| Event | These quests are obtained during specific times of the year or thematic events. Whether they are repeatable or not depends on the event itself. | |
| Main | These quests are part of the episode and are mandatory if you want to unlock the next episodes. They can only be completed once. | |
| Side | These quests are optional and do not interfere with unlocking new episodes. They can only be completed once. | |
| Repeatable | These quests are optional and do not interfere with unlocking new episodes. They can be done multiple times, as long as the player meets the required conditions. |
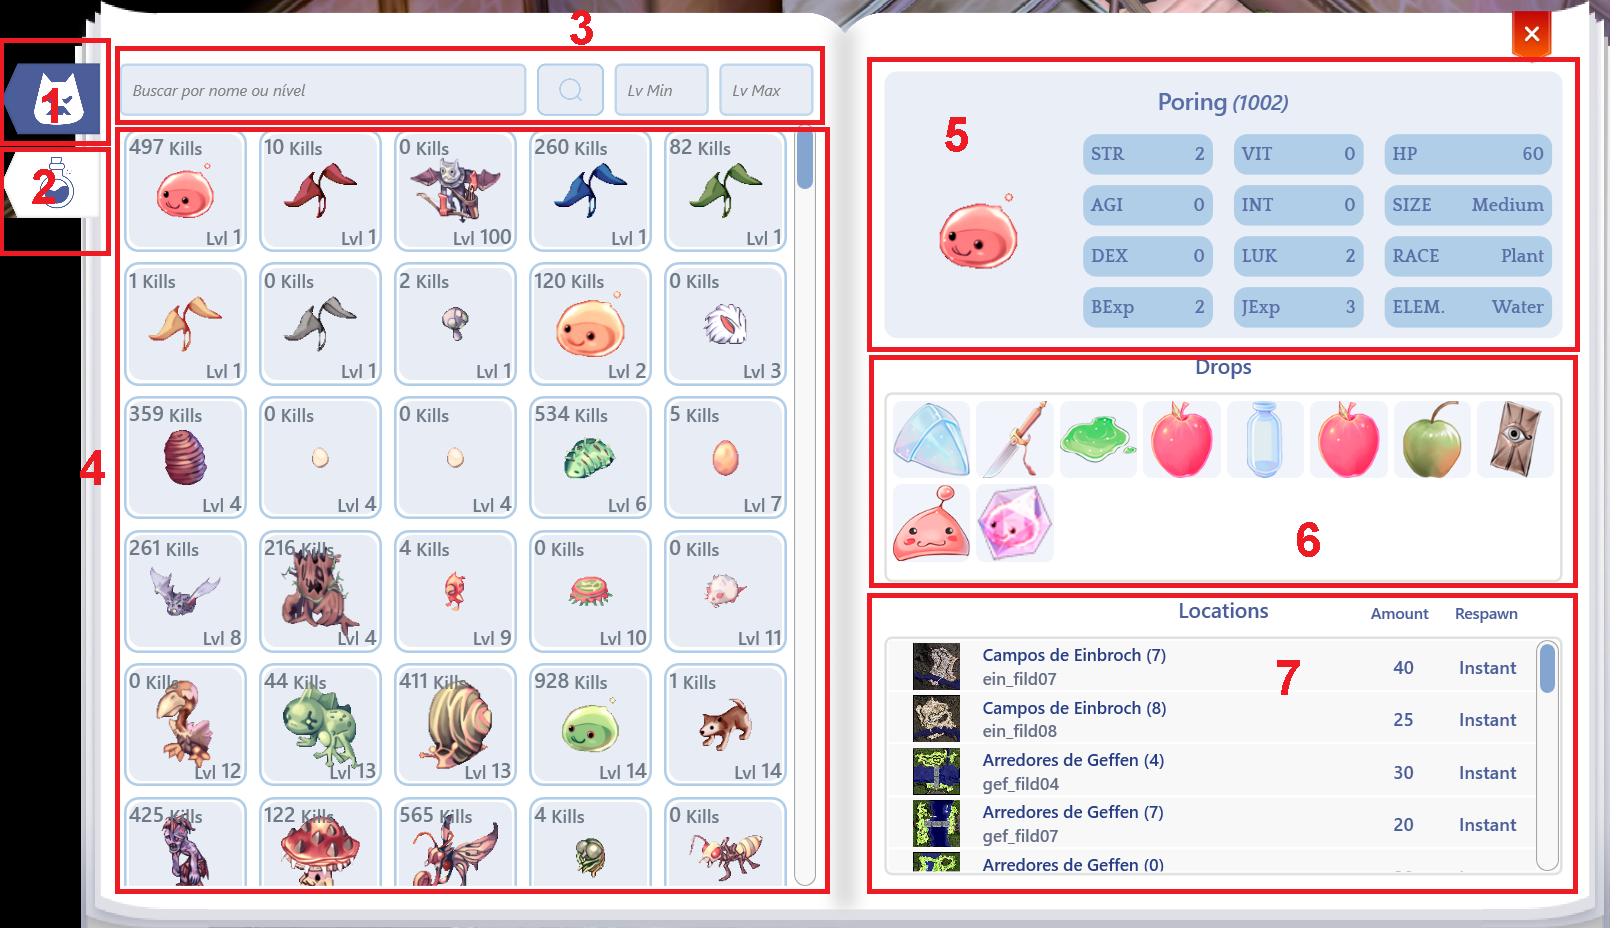
ALT+B (Bestiary Information)
| N | Name | Information |
|---|---|---|
| 1 | Monster Tab | Search area for monsters. |
| 2 | Item Tab | Search area for items. |
| 3 | Search | Area to type what you are looking for. |
| 4 | Glossary | Information on all monsters/items. |
| 5 | Monster Information | Displays the monster’s stats. |
| 6 | Drop Information | Displays item drop rates and chances. |
| 7 | Monster Location on the Map | Shows where to find the monster. |
ALT+C (Informações da Coleção)
.png?alt=media)
Current Map Collection Information
| N | Information | Description |
|---|---|---|
| 1 | Map Name | Information about the current map you are on. |
| 2 | Additional Map Information | Complementary details about the current map. |
| 3 | Map | Information about the map you are in. |
| 4 | Attributes Received in the Collection | Attributes obtained upon completing the collection. |
| 5 | Required Items | Items needed to complete the collection. |
| 6 | Completed Stages | Displays the completed stages. |
ALT+T (Achievements Information)
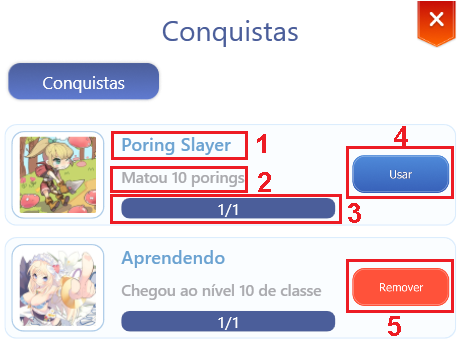
Achievement Details
| N | Information | Description |
|---|---|---|
| 1 | Title | Obtained title. |
| 2 | Objective | What needs to be done to receive the title. |
| 3 | Progress | Your achievement progress. |
| 4 | Use | Equip the title. |
| 5 | Remove | Unequip the title. |
ALT+F (Friends List Information)
ALT+Z (Creating a Party)
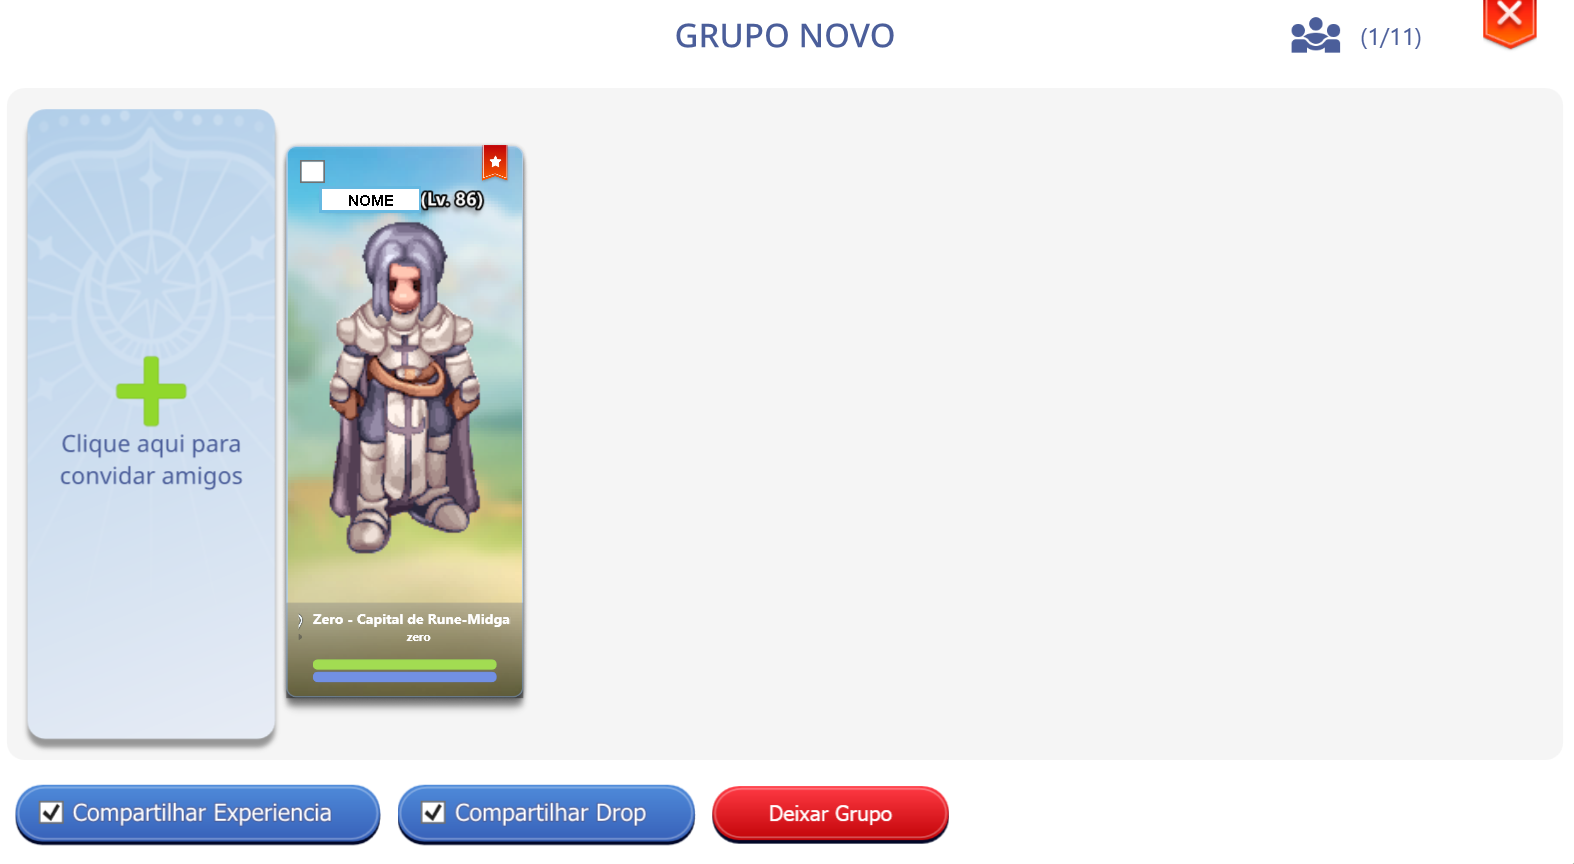
Party Creat
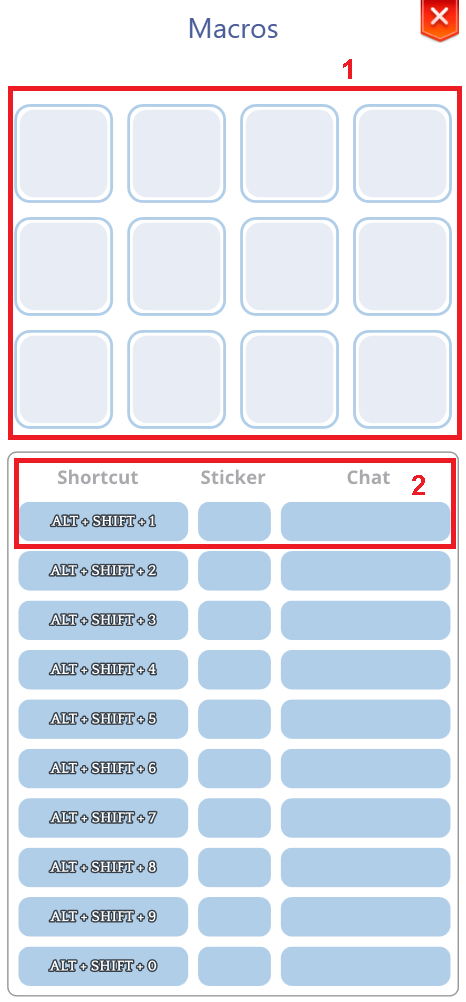
| N | Information | Description |
|---|---|---|
| 1 | STICKERS | The place where your stickers are stored. |
| 2 | Shortcuts | The place where you configure shortcuts to send your stickers in chat. |